Transform your Space with an Open Floor Plan

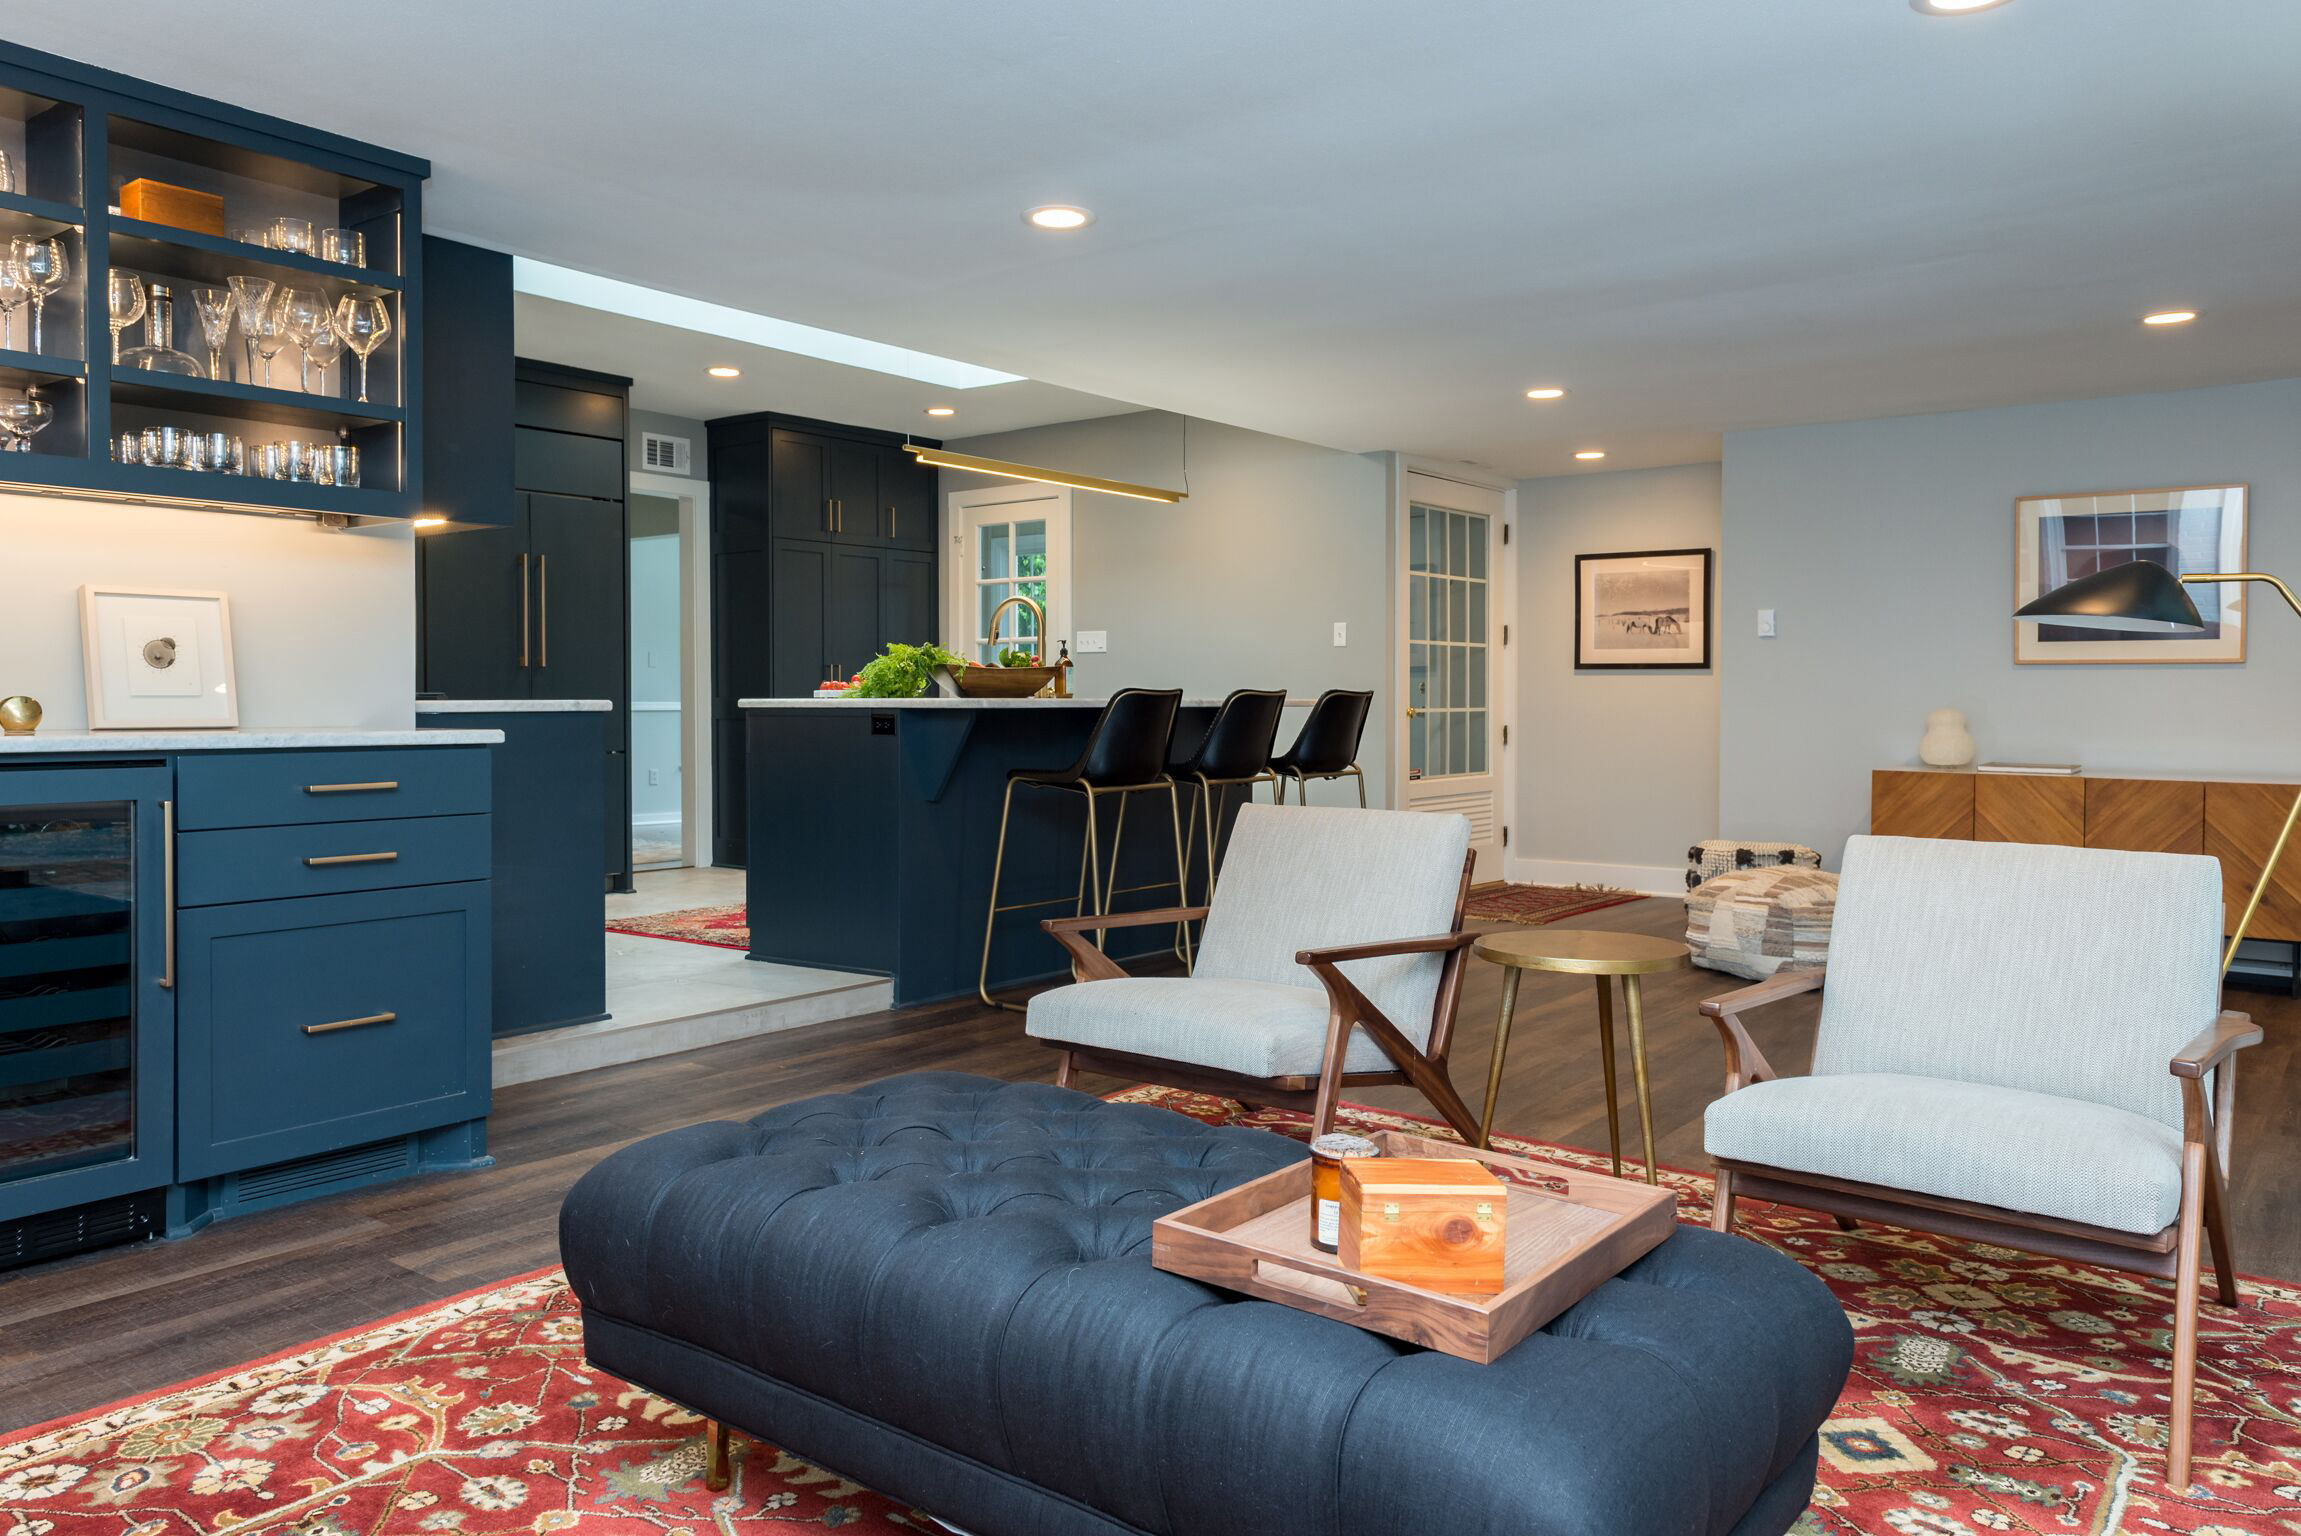
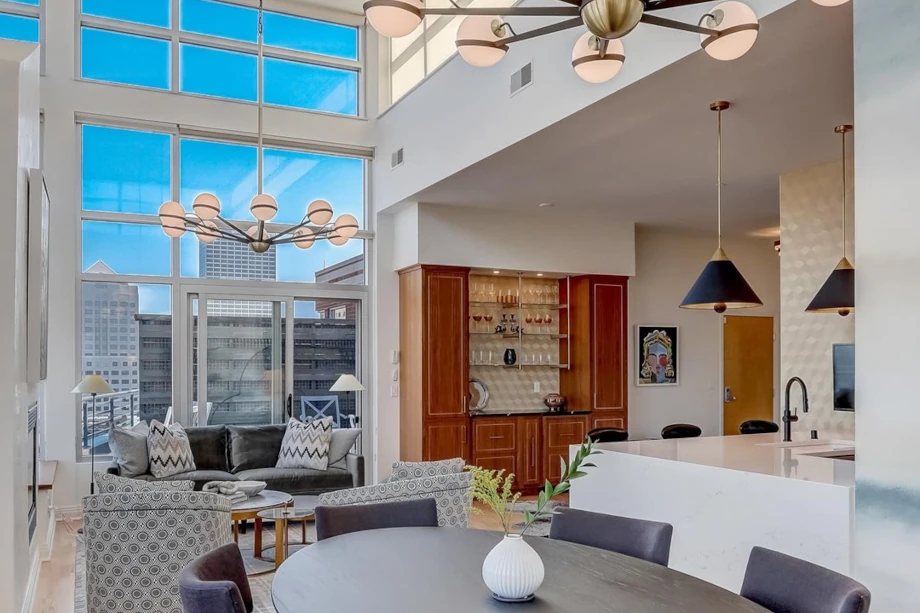
An open floor plan has become popular in home remodeling for creating spacious environments that bring people together.

Whether you enjoy hosting gatherings, spending quality time with family, or simply want a home that feels more open and connected, open floor plan homes offer a world of possibilities.

What is an Open Floor Plan?

open floor plan home remodeling
A home remodel in Milwaukee / LaBonte Construction.

An open floor plan is a design concept that removes barriers and walls between different living areas. It creates a spacious and seamless flow throughout the home and embraces a fluid and interconnected approach to living spaces.

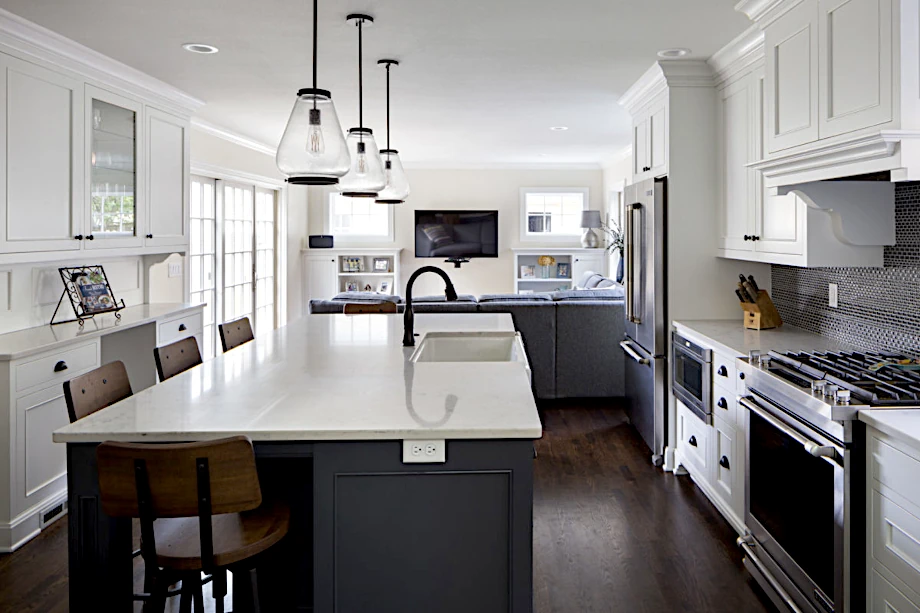
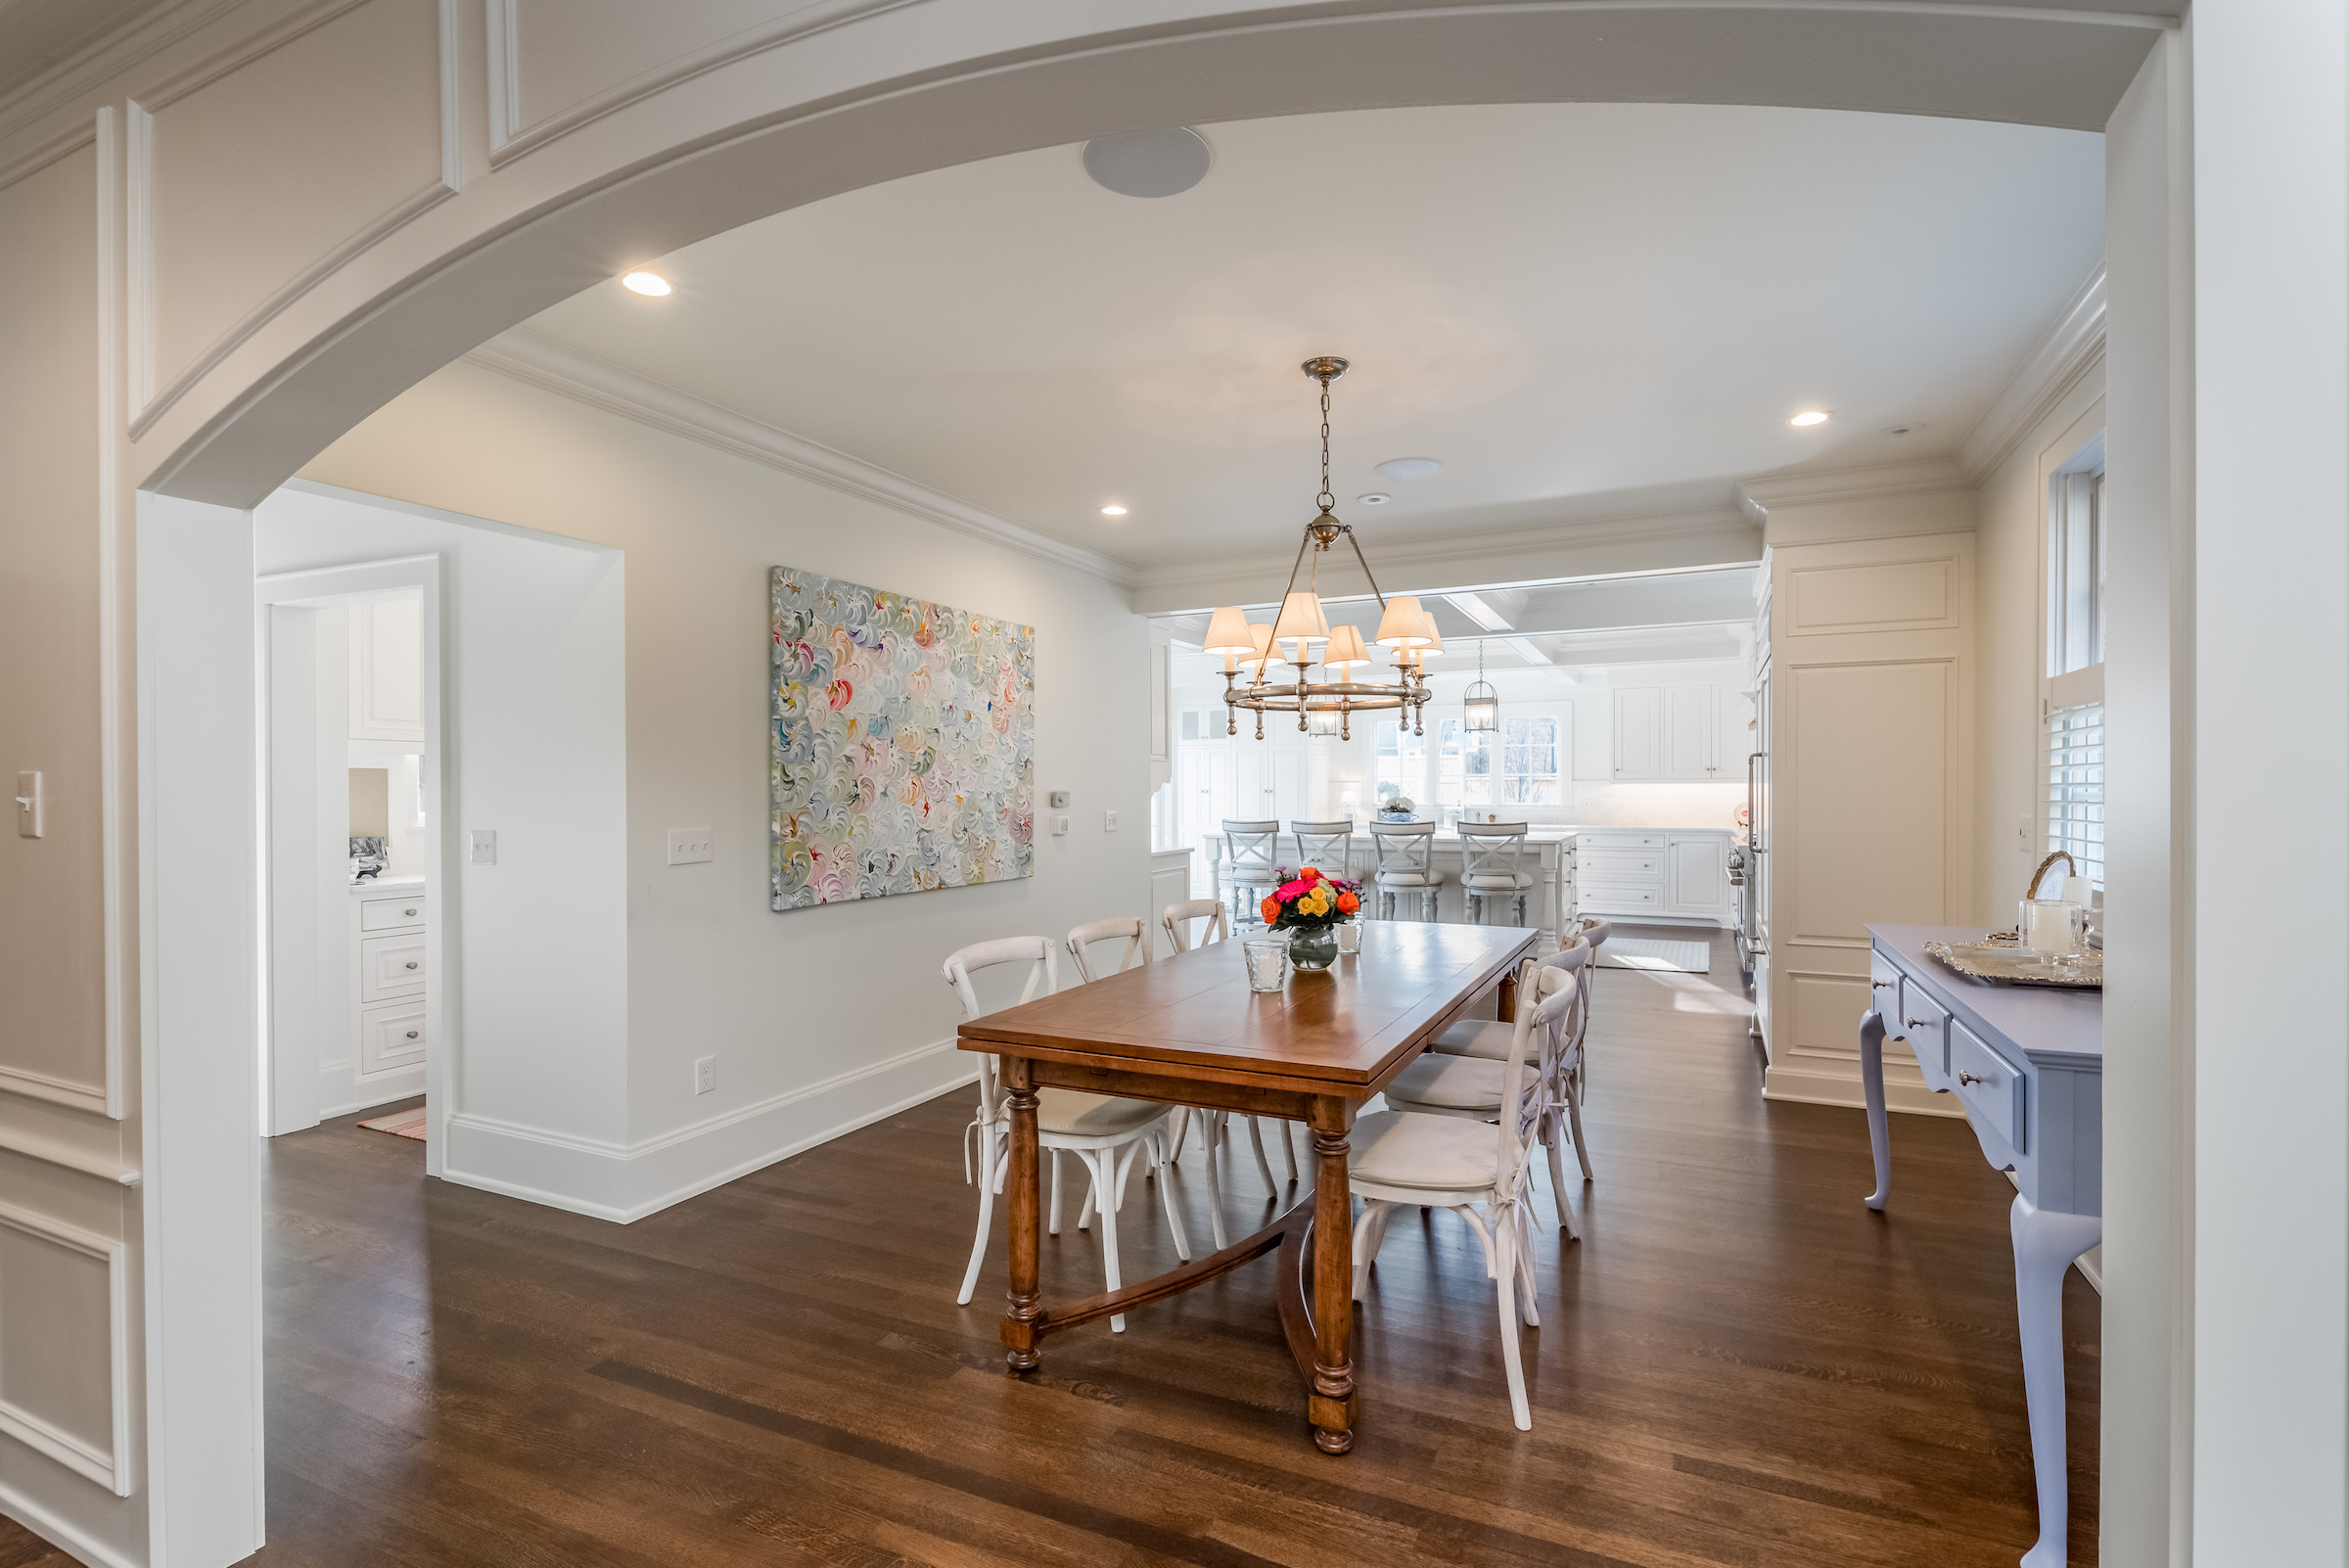
Open floor plan homes typically feature the kitchen, dining area, and living room integrated into one expansive space. The uninterrupted sightlines make the entire area feel larger and more connected.

Natural Light

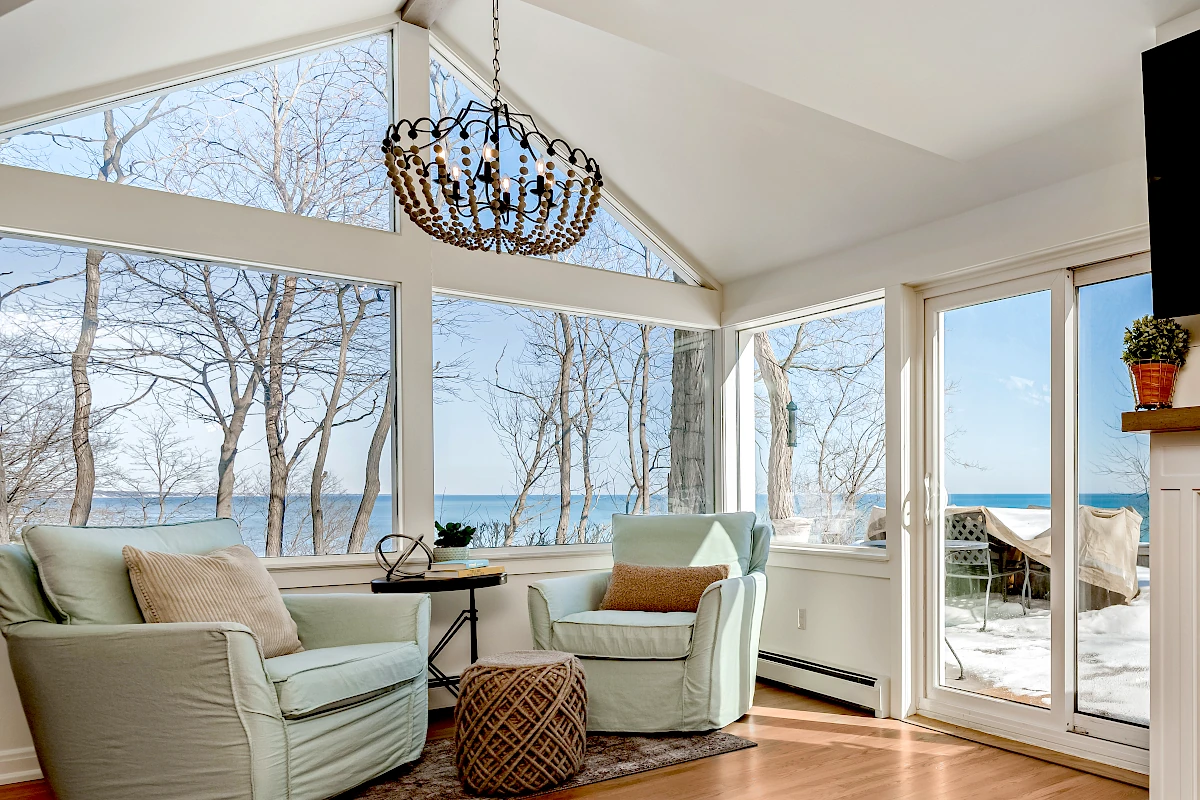
One of the key features of an open floor plan is the abundance of natural light that fills the entire area. Without walls obstructing the flow of light, it can freely travel throughout the space, creating a bright and airy atmosphere. This enhances the overall aesthetics and contributes to a more uplifting and pleasant living environment.

Versatility

Fewer walls and defined rooms means freedom to arrange furniture and create functional zones that suit your needs. You can create a cozy reading nook by the window, a play area for children, or a spacious entertainment zone.

Flow and Connectivity

Furthermore, open floor plans promote better traffic flow within the home. Without walls and narrow corridors, you can move around more freely and effortlessly. It eliminates the feeling of confinement and allows for a more intuitive and efficient use of space.

Enhanced Entertaining and Family Time

open floor plan home remodeling
A home remodel in Whitefish Bay / LaBonte Construction.

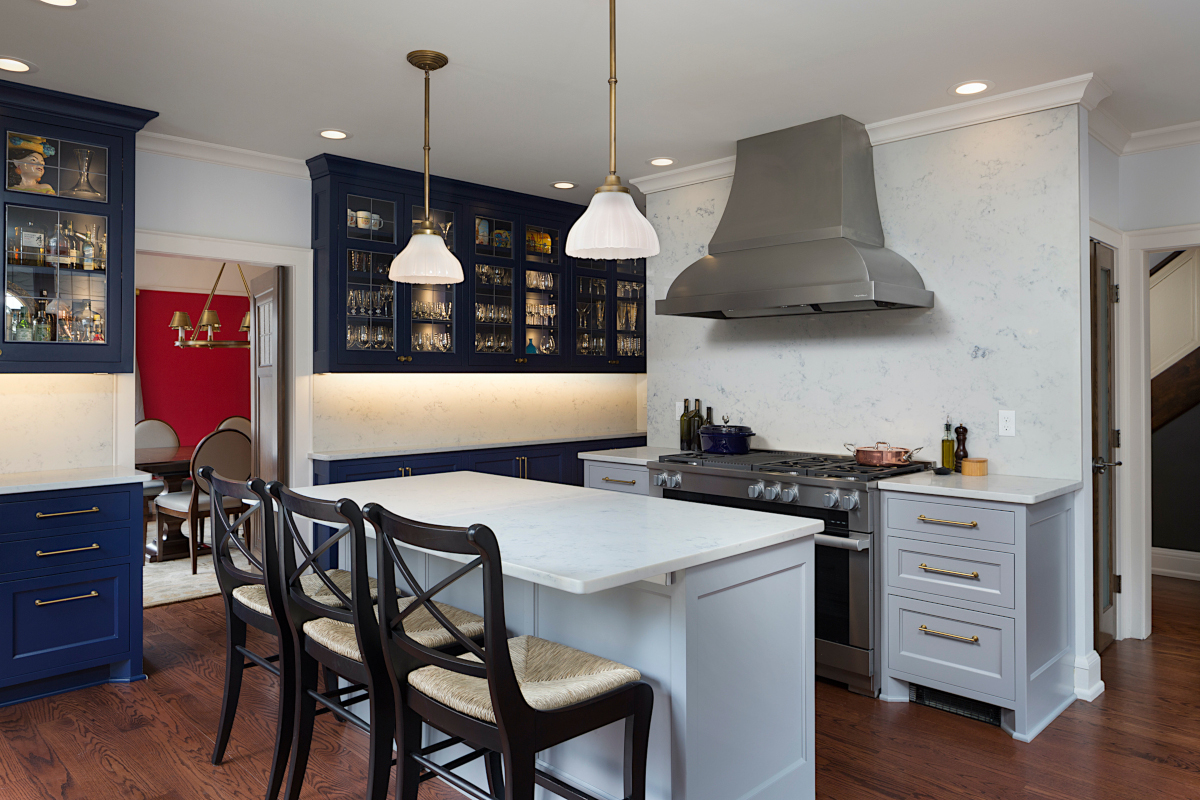
Imagine hosting a dinner party where you can prepare meals in the kitchen and still converse with guests in the dining and living areas.

With an open floor plan, you no longer feel isolated in the kitchen, away from the action. Instead, you can be part of the lively atmosphere and interact with your guests effortlessly.

Also, an open floor plan allows for better circulation of guests during parties or events. People can move freely between the different areas without feeling cramped or confined.

The welcoming and inviting atmosphere of an open floor plan will make your home the go-to place for celebrations and get-togethers.

Flexibility and Adaptability

Additionally, the open nature of the floor plan makes it easier to arrange furniture and create different seating areas for various activities.

You can set up a cozy corner with comfortable chairs for intimate conversations or create a larger seating arrangement for movie and game nights. The possibilities are endless, and you have the flexibility to adapt the space to accommodate different types of gatherings.

This flexibility is particularly valuable in growing families, as it allows the home to evolve as your needs change over time.

For example, you can create a playroom for young children where they can be safe and kept within view. As they grow older, the same space can be repurposed as a study area or entertainment zone.

The absence of walls makes it easier to modify the layout and functionality of the space without the need for major renovations.

Additionally, an open floor plan promotes better traffic flow throughout the home. There are no narrow hallways or tight corridors to navigate, which can often feel restrictive.

Instead, you can move freely and seamlessly between different areas, creating a more spacious and interconnected environment.

Improved Safety and Efficiency

open floor plan home remodeling
An open floor plan home remodel in Bayside / LaBonte Construction.

The open layout also promotes better communication and interaction among family members.

Whether you’re preparing a meal in the kitchen while your children play nearby or you’re hosting guests in the living room, the absence of walls allows for seamless conversations and engagement. You can easily participate in discussions, keep an eye on everyone, and foster a sense of togetherness.

To promote safety and privacy in an open floor plan, consider strategically placing  design elements such as furniture placement, area rugs, and decorative screens.

These elements can help define different zones, create visual boundaries, and provide a sense of privacy when desired.

Accessibility

An open floor plan naturally supports accessibility. With fewer doorways and confined spaces, wheelchairs and walkers encounter fewer obstacles. And more natural light throughout the home enhances visibility.

An accessible home can also attract a larger pool of potential buyers when it’s time to sell.

Energy Efficiency

Open floor plans also contribute to improved energy efficiency. Natural light reduces the need for artificial lighting during the day, saving energy and lowering electricity bills. Adequate natural light has been shown to enhance mood, productivity, and overall well-being.

Open floor plans improve airflow and ventilation, promoting a healthier indoor environment and reducing reliance on mechanical ventilation systems.

This natural ventilation helps maintain optimal air quality, prevents the buildup of stale air or pollutants, and enhances the overall comfort of the living space.

Also, an open floor plan distributes heat and cool air more effectively. This improved temperature regulation can result in more efficient heating and cooling, reducing energy consumption and utility costs.

Additionally, open floor plans facilitate passive heating and cooling techniques such as cross ventilation and solar gain.

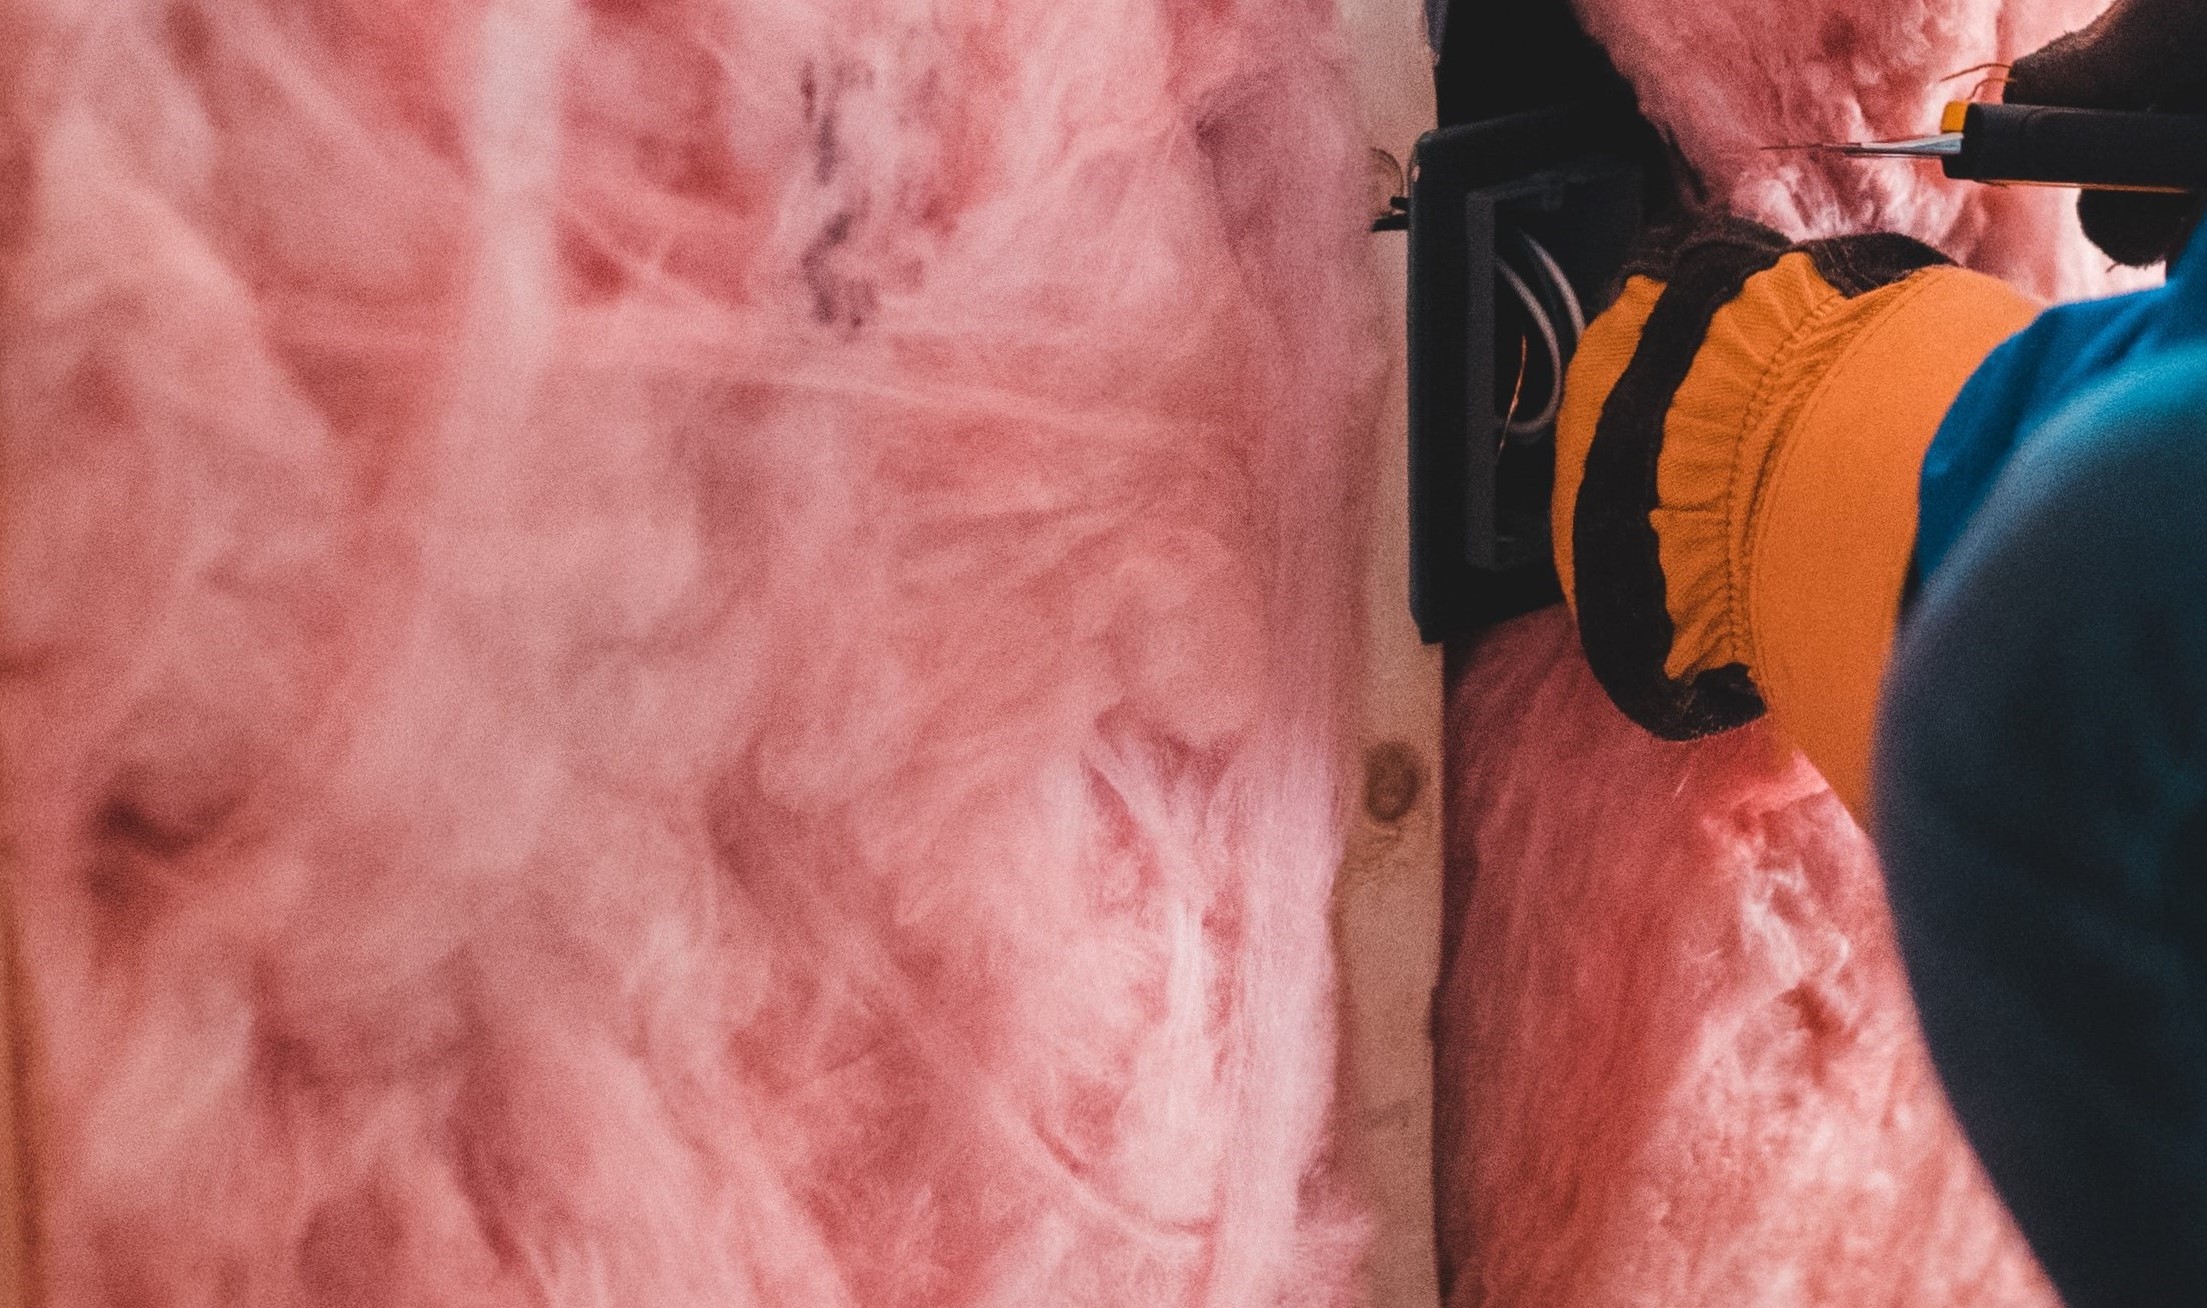
See also: Our posts on energy-efficient windows and energy-efficient insulation.

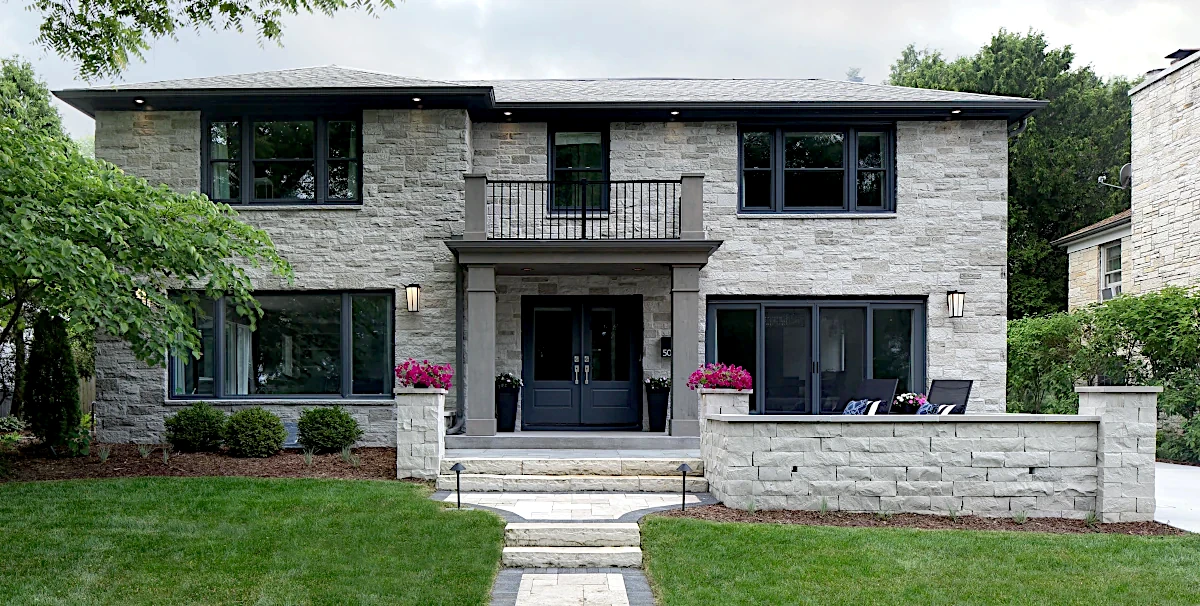
Transform Your Home with an Open Floor Plan

An open floor plan improves visibility and safety within your home by allowing for better sightlines, promoting communication and interaction, and reducing potential hazards. It creates a more open and connected living space where you can easily monitor activities, foster family togetherness, and enjoy the benefits of increased natural light.

Transforming your home with an open floor plan offers a multitude of benefits that can enhance your lifestyle and elevate your living space. From the sense of spaciousness and flexibility to improved entertaining capabilities and better visibility, open floor plans have become increasingly popular for homeowners seeking a modern and functional living environment.

When you’re ready to discuss your home remodeling project, contact us at LaBonte Construction.

We were voted Best of Milwaukee 2024 by Shepherd Express readers in the Home Remodeling, Basement/Rec Room Remodeler, Bathroom Remodeler, and Kitchen Remodeler categories.

Window Types for your Home Remodel

We hope this survey of window types will help you make the right choices for your home remodel.

Windows are an essential consideration to maximize curb appeal and add character for a home’s exterior. But they also must satisfy the everyday needs of the people living inside. So keep both functions in mind when choosing windows for your home remodel.

See also: Our post on Energy-Efficient Windows.

Window Types: Casement

Casement windows have long been a traditional window style in American home building.

Also known as crank windows for the method used to open them, they swing in or out, attached to the frame by one or more side hinges.

Casement windows can have a tighter seal when locked than double-hung windows.

Popular for:

Kitchens, home offices, bathrooms.

Pros

  • Easy to open and close.
  • Weathertight, energy-efficient seal.
  • Promote great airflow.

Cons

  • Mechanical parts may wear or break.
  • Prone to damage if left open in bad weather.
  • Not suitable for window air conditioning units.

Double-Hung or Single-Hung Windows

Double-Hung Window in Milwaukee Home Remodel

Double-hung window in Whitefish Bay home remodel (Click for larger image) / LaBonte Construction.

Double-hung windows are the most common windows we install in remodeling projects. A double-hung window has two sliding sashes. The bottom panel opens by sliding the sash up, while the top panel opens by sliding the sash down.

The top and bottom sashes fit snugly into the window frame, helping to limit air infiltration into your home.

Double-hung windows are ideal for families, as they’re a safer choice for homeowners with children or pets. You can open the upper sash for necessary venting and close the bottom sash to prevent accidental falls.

Popular for:

Second-story spaces, living rooms, bedrooms.

Pros

  • Offer great ventilation.
  • Widespread retail offerings.
  • Cost-effective.

Cons

  • May develop slipping problems.
  • Require more physical effort to open or close.
  • Seal isn’t weathertight.

Picture Windows

Picture windows are great for providing lots of natural light and unobstructed views of the outdoors. These large square or rectangular windows are a popular option for showcasing spectacular views, such as a lake, mountain, or woods.

As permanent, unmoving windows, they offer a weathertight seal and a lower cost than mechanical windows.

However, picture windows provide no airflow, so make sure the room has other sources of ventilation.

Also, picture windows aren’t always energy efficient. The heat from inside the home may escape during cooler months, while sunlight may overheat the interior space in warmer months.

Popular for:

Living rooms, bedrooms, home offices.

Pros

  • Deliver an unobstructed view.
  • Less expensive than mechanical windows.
  • Weathertight seal.

Cons

  • Outside can be hard to clean.
  • May be an energy drain.
  • No airflow or ventilation.

Bay Windows

Bay Window in Wisconsin Home Remodel

Bay window (Click for larger image) / LaBonte Construction.

Bay windows are generally three separate adjacent windows that extend outward from the wall of a home. This window provides a wider-angle view of the outdoors than a picture window alone. Also, it can provide direct sunlight during more hours of the day.

They are often the visual centerpiece of living rooms, family rooms, and parlors. Usually, the center window is a larger picture window, while the two on each side are casement or single- or double-hung windows.

Bow window

A bow window usually features more than three window surfaces, producing more of an arch shape. Unlike bay windows, all the windows are identical. Due to their complexity, they can be expensive to install.

Popular for:

Kitchens, dining rooms, bedrooms.

Pros

  • Architecturally interesting.
  • Allow a lot of natural light.
  • Can add square footage inside a home.

Cons

  • Expensive.
  • Require skilled installation.
  • May block walkways or exterior space.

Sliding Windows

Sliding Window in Whitefish Bay Home Remodel

Sliding window in a Milwaukee bedroom remodel (Click for larger image) / LaBonte Construction.

Sliding windows are structurally similar to single- or double-hung windows. But their horizontal orientation doesn’t have to overcome gravity.

Two side-by-side pieces of glass slide horizontally along the top and bottom tracks. In some varieties, only one panel slides.

Popular for:

Kitchens, living rooms.

Pros

  • Among the least expensive windows to install.
  • Good options for egress windows.
  • Easy to operate and durable.

Cons

  • May stick over time.
  • Cleaning the outside is challenging.
  • Center frame obstructs views.

Awning Windows

Awning Window in Wisconsin Home Remodel

Awning window below a picture window (Click for larger image) / LaBonte Construction.

Awning windows use a crank mechanism to open, similar to casement windows. But awning windows open up from the bottom.

These windows get their name from the awning-like protection they provide when open. This makes them good options if you like to keep your windows open during rainfall.

Popular for:

Bathrooms, hallways, kitchens.

Pros

  • Can remain open during rainfall.
  • Quite airtight and secure.
  • Easy to open and close.

Cons

  • Mechanical parts may wear or break.
  • Prone to damage if left open in elements.
  • May obstruct exterior spaces.

Decorative Glass Windows

Available in a variety of styles from stained glass to glass blocks, decorative glass windows are generally stationary. They provide light to the inside while also offering privacy and visual appeal.

Although they offer natural light to the interior, decorative glass windows are not the way to go if you want an exterior view.

Glass block windows

Glass block windows are produced with blocks that are mortared in place. The thick blocks are usually semi-opaque glass that allow light to enter the room while distorting the view. So glass block windows are standard in places of high privacy, like bathrooms.

Stained glass windows

With different colors and designs to choose from—such as abstract or pictorial—stained glass windows allow light to pass into your house through a tinted color window pane. They are works of art in and of themselves!

Popular for:

Bathrooms, laundry rooms, entryways.

Pros

  • Offer light and privacy.
  • Can complement historical homes.
  • Weathertight.

Cons

  • No view of the outside.
  • May seem dated.
  • Thinner panes are not energy efficient.

Skylights and Roof Windows

Skylight in a kitchen remodel (Click for larger image) / LaBonte Construction.

Installed in the roofline, skylights and roof windows provide much-needed light for cramped spaces of the home like upstairs and in the attic.

  • Skylights are usually fixed and installed in a roofline.
  • Roof windows open and close for ventilation, using a hinge like a casement or awning window.

Popular for:

Attics, bathrooms, laundry rooms, hallways

Pros

  • Provide natural light to dark or interior spaces.
  • Can help with interior solar heating.
  • Aesthetically appealing.

Cons

  • Susceptible to damage from hail, other elements.
  • Improper sealing can result in leaks.
  • Challenging to clean.
  • Can be challenging to open.

Tilt-Turn Windows

Tilt-turn windows allow you to either tilt them outward or inward for ventilation, or turn them similar to a casement window. These windows are common in Europe, but have also made their way into many Milwaukee home remodels. Tilt-turn windows fit snugly into the frame, and the vinyl frame is an excellent insulator. Because they can be used as a vent, you can leave tilt-turn windows open without sacrificing security.

When you’re ready to discuss windows for your home remodeling project, contact us at LaBonte Construction.

We were voted Best of Milwaukee 2024 by Shepherd Express readers in the Home Remodeling, Basement/Rec Room Remodeler, Bathroom Remodeler, and Kitchen Remodeler categories.

The Best TV Placement in Your Home

Where is the best TV placement for you? In many home remodeling projects, the TV ends up in the living room.

But maybe you frequently entertain guests in your living room while your TV stays dark. If you play board games or host a sewing circle more than watch TV, perhaps you should consider another room.

Regardless of which room in your home you put the TV, make sure you keep the following items in mind.

Position in room

If watching TV is the primary activity in your TV room, take care to find the best place for it. And when deciding the best position, consider the viewers—not the TV­—first.

Position relative to seating

The Society of Motion Picture and Television Engineers recommends that the TV screen fill at least 30 degrees of your horizontal field of view.

Product ratings website, Rtings.com, features a TV size-to-distance calculator to help determine the best seating distance. For your convenience, a sampling of its calculations are below:

TV size Distance from TV
42” 5.9 feet
50” 7 feet
55” 7.7 feet
65” 9.1 feet
75” 10.5 feet
85″ 11.9 feet

Position relative to lighting

Mounted TV in Fitness Room

Ideally, your TV screen will be untouched by direct light or a significant reflection. That means a window on the opposite wall from the TV would be problematic.

Also, placing the TV directly in front of a window could aim two competing light sources at your eyes. This would cause eye strain and a compromised view of the screen.

The window in your TV room should be perpendicular to the screen and somewhat far from it. Letting your TV light itself will ensure you get the best picture possible.

But it’s also important to have sufficient ambient light. Many viewers’ preference for complete darkness is a poor choice for eye health.

How to mount your TV

Do you want to mount your TV or put it on a media stand? Mounting a TV looks cleaner and frees up surface space for gaming consoles or Wi-Fi routers. A traditional media stand is more straightforward and won’t require any drilling. Then you will have more flexibility to rearrange your living room.

Directly on the wall

Mounted TV in Remodeled Kitchen Wisconsin

If everyone agrees on the TV placement, mounting it like a picture on the wall may be the tidiest option. In addition to freeing surfaces, it leaves the most square footage for non-TV activities.

A swivel mount

If different viewers have different preferences, of you have a wide seating area with a varying number of viewers, a swivel mount lets you angle the screen in any direction. This customizes the viewing experience for whomever is watching. Depending on the model, you can position the TV a few feet away from the wall. Or fold it in to keep the TV out of the way.

What’s the right height?

In addition to the distance between your TV and seating, it’s important to have your TV at the right height to avoid neck strain.

Experts recommend that the middle of your TV be at eye-level while seated. This is generally about 42 inches from the floor.

Diagonal screen size Screen Height Distance Floor to screen bottom
43” 22” 31”
50” 25-1/2” 29”
60” 29-1/2” 27”
75” 37” 22”
85” 42” 20”

Feng Shui

The Bagua map is the Feng Shui energy map that helps determine positions and directions of objects, furniture, and other inanimate objects in a home. According to Fengshuitricks.com, the Bagua map can instruct us on TV placement:

According to the Bagua map, the north side supports a person’s career and professional goals, and the powerful Yang energy of the TV can support this if you place it on the north side of the room.

You can also put your TV on the south side of the room, which supports fame and recognition according to the Bagua map in the corner.”

If your focus is more on career and success, you can place the TV in the north to bring you luck.

However, if you’re looking for fame, want more followers on social media, or just need some recognition, you can place the television on the south end of the room.

Other Feng Shui TV tips:

Consider the position of the sofa. It must be placed in a commanding position, ideally in the center of the room. Also:

  • The entry to the living room must not be behind the sofa.
  • There shouldn’t be any windows, mirrors, or walkways behind the sofa.
  • The sofa shouldn’t face heavy furniture or staircases.

Cover the screen when not in use. Ideally, store the TV in a cabinet that can be closed when the TV is off. Alternately, you can use a sheet, blanket, or a purpose-built TV cover. Covering the screen prevents the reflection of negative energy into the room.

Avoid clutter around the TV. According to Feng Shui, eliminating clutter ensures the clear flow of energy within the home. This applies to the area around the TV—particularly for any wires connecting to video games or home theater components.

The Best TV Placement For Your Milwaukee Home Remodel

Regardless of your space or needs, contacting a qualified remodeling contractor like LaBonte Construction should be your first order of business after taking inventory.

Contact us today to set up a consultation for your next project.

Check us out on Facebook and Houzz.

Guide to Home Siding

This guide to home siding discusses the most popular types in the Midwest, as well as some popular options nationwide. We hope we can help you choose the right one for your home remodeling project.

The U.S. Census Bureau publishes Characteristics of New Housing, updated monthly and annually. One report tracks exterior siding used on new single-family houses. The table below compares siding types used in the Midwest and nationwide.

Siding Material Midwest US
Vinyl 60% 26%
Wood 17% 4%
Fiber cement 12% 22%
Brick 7% 19%
Other* 2% 2%
Stucco 1% 27%
*Other: concrete block, stone, aluminum siding, and other types.
Source: Primary Type of Exterior Wall Material of New Single-Family Houses Completed, U.S. Census Bureau.


Nationwide, stucco was the most popular siding in 2021, covering 27% of homes. But in the Midwest, stucco adorned just 1% of homes. That’s below the “Other” category, which included concrete block, stone, aluminum siding, and other types.

Another notable difference is the popularity of wood siding in the Midwest. Wood was chosen for 17% of houses in the Midwest—behind only vinyl (60%). Nationally, wood was used in only 4% of houses, ranking just above “Other” (2%).

In Southeastern Wisconsin, most of our luxury remodeling projects use cedar siding. When we are remodeling a client’s home, some want us to match their existing siding.

Others elect to upgrade their siding to a newer, lower-maintenance, or more luxurious material.

Guide to Home Siding: Wood

In Milwaukee, we most often see clear cedar siding. Clear means there are no knots in the wood, allowing for a nicer surface finish and a less rustic look if stained.

On the downside, clear siding can double the material budget of an exterior remodeling project.

Wood siding comes in many profiles and patterns. Here are the ones we see the most:

  • Clapboard
  • Bevel
  • Shiplap
  • Nickel gap
  • Dutch lap
  • Tongue & groove
  • Wavy edge

Wood siding also comes in different thicknesses, allowing your remodeling contractor to create the exposure you want. This exposure is referred to as “to the wind” by builders and lumber suppliers.

Most of our home remodeling clients paint or stain their wood siding. To help your siding last longer, we recommend treating it before you install it, so that you can treat all surfaces.

Depending on the thickness of your finish, exposure to the elements, and installation method, paints and stains can last anywhere from a year to 25 years.

Shou Sugi Ban

guide to home siding shou sugi ban home remodeling
Shou sugi ban: Art House Project in Naoshima, Kagawa prefecture, Japan / Wikimedia Commons

If you want long-lasting wood siding without painting or staining, consider shou sugi ban—an ancient Japanese wood-burning process.

The siding’s longevity comes from the residual layer of char left over  from burning and the coating of oil applied afterwards.

Shou sugi ban also creates a beautiful, black finish—which can be a great look for a traditional or modern home.

Here are some advantages of the shou sugi ban-treated siding:

  • Low maintenance
  • resistance to decay and rot
  • insect repellant properties
  • lack of chemicals
  • Sustainability

While shou sugi ban treatment can be done on the home building site, it is best done in a controlled environment with purpose-built machinery to provide a uniform finish.

Guide to Home Siding: Fiber Cement

Modern fiber cement siding premiered in the 1980s. (The original formula—dating to the early 1900s—included asbestos.) It now consists of portland cement, sand, water, and cellulose fibers.

Pros

  • Durable: Some companies offer a 50-year warranty
  • Rigid, while maintaining some flexibility
  • Easy to paint
  • Low maintenance
  • Warp resistant
  • Fire resistant
  • Insect resistant

Cons

  • Heavy
  • More expensive
  • Brittle—may chip or crack
  • Dusty when cut

Fiber cement is long lasting and provides excellent overall value. Generally, it costs less than brick, synthetic stucco and some wood siding options. It’s typically equally or less expensive than hardboard or composite siding, and more expensive than vinyl.

Guide to Home Siding: Metal

Metal siding is becoming increasingly popular among homeowners, including in Wisconsin.

Pros

  • Low maintenance
  • Insect resistant
  • Durable
  • Fire-resistant
  • Recyclable
  • Energy-efficient*
  • Many colors, styles and profiles

*Metal siding reflects heat in summer. But it won’t absorb as much of the sun’s heat in winter, so make sure walls are well insulated.

Cons

  • Expensive:
    1. Vinyl siding = $2.50 and $10.75 per square foot.
    2. Fiber cement = $5 and $15 per square foot.
    3. Metal siding = $7 and $16 per square foot.
    4. Brick veneer siding = $11 and $24 per square foot.

    Prices from Family Handyman website (August 2022).

  • Installation: Generally much heavier than vinyl siding and more difficult to cut.
  • Dents: Hard impacts from tree branches, vehicles, sports equipment and even hammers during installation can dent a metal panel. This kind of damage is a pain to repair or replace.

Guide to Home Siding: Vinyl

A durable form of plastic commonly used on the exterior of homes, vinyl comes in many colors and styles. Some styles imitate the look of wood and other siding materials.

Nationwide, vinyl siding was a close second to stucco for the most popular exterior on new houses completed in 2021. In the Midwest, though, vinyl was easily the most popular, covering the exterior of 60% of new houses.

The US Census survey did not differentiate between insulated and standard vinyl siding, but it’s worth examining.

Insulated vs. Non-Insulated Vinyl Siding

Since its appearance in the 1990s, insulated vinyl siding (also known as foam-backed siding) has solved many of the problems of standard vinyl siding.

  • Provides insulation from the weather.
  • the foam layer also absorbs impacts that could crack or dent traditional vinyl siding.
  • The foam layer can also conceal some of the natural shifting and settling of walls over time.

But standard, non-insulated vinyl siding may be a better choice if you:

  • Have a lower home remodeling budget. Few siding materials are less expensive than vinyl siding.
  • Aren’t concerned about the long-term appearance or durability of the siding, like when flipping a home for quick sale.
  • Plan to install it yourself but have limited installation experience.

Guide to Home Siding: Engineered Wood

Engineered Wood Siding for Home Remodel
Engineered wood siding.

In engineered wood siding, wood strands are broken down and mixed with resins and waxes to improve strength and performance. In addition, it’s also flexible and gives the look of real wood to your home.

Most brands are made with zinc borate. This additive helps the wood resist rot, fungal decay, and termite damage.

Pros

  • Impact-resistant.
  • Weather-resistant (hail damage, wind, moisture).
  • Protection against rotting and termites.
  • Can be installed quickly.
  • Flexible with temperature changes.

Cons

While engineered wood siding has many advantages in durability and aesthetics, its disadvantages are similar to wood siding.

  • Wood can still rot.
  • Water and termite infiltration, if not installed properly.
  • Wood fibers are flammable.

Note: Professional installation can help ensure that your engineered wood siding will last a long time.

Get the Best Siding for Your Remodeled Home

When you’re ready to discuss siding for your home remodeling project, contact us at LaBonte Construction.

We were voted Best of Milwaukee 2024 by Shepherd Express readers in the Home Remodeling, Basement/Rec Room Remodeler, Bathroom Remodeler, and Kitchen Remodeler categories.

Adding a Dormer to Your Home

Adding a dormer can be one of the best home remodeling projects for adding value to your house. Attractively designed dormers increase the appeal of your home from the outside. And they create more living space, natural light, and functionality on the inside.

A dormer can transform a dark, stale attic room into a vibrant, well-ventilated living space for hobbies and activities. Or a calming area for reading, meditating, or sleeping.

A dormer is a structure built out from the plane of a sloped roof, often including a window. The dormer has its own roof, siding, and sometimes even gutters integrated with the home’s existing elements.

A dormer—named after the Latin term “dormitorium” (a place for sleeping)—is often used to convert an attic space into a bedroom.

Adding a Dormer: Dormer Styles

Many of the following dormer styles are derived from roof styles. See our recent article on common roof types and more detailed discussion on roofing designs and materials.

Gable Dormer for Home Remodel Milwaukee

Gable dormer / Wikimedia Commons

Gable dormer

The most common style of dormer window, it features a gable—a triangular roof with slopes of equal pitch—over the window. Often found on Cape Cod and Colonial homes, they naturally complement the common gable roof.

Gable dormers are typically built along the slanted sides of the main roof, called eaves.

Gable dormers give the home a colonial revival look, with the windows emerging from the roof and adding character to what may be a flat, dark surface on the front of the house.

Shed dormer

The shed dormer (see featured image above) has a single roof panel sloped in the same direction as main roof, but with a much shallower pitch. It is typically used with Craftsman and Contemporary architecture.

This simple design is a great choice for increasing total floor space, when adding bedrooms or other large living spaces.

Hip Dormer for Remodeled Home

Hip dormer / Wikimedia Commons

Hip dormer

A hip dormer features three roof planes—one on each side and a third parallel to the front of the dormer. Like in a hip roof, all three planes slope upward and meet at a common point at the peak.

Gambrel dormer

The roof on a gambrel dormer features a gable at the peak of the roof, but then descends into two steeper roof slopes on the sides of the roof. This gives the gambrel dormer a barn-like look.

Eyebrow dormer

An eyebrow dormer roof features a gently curved wave that extends over the window. With no vertical wall sides, it can give the impression of an eye peering out from under a hooded lid.

Bonnet dormer

A bonnet dormer has a curved roof and vertical walls on each side of the window. Arch-top windows are commonly installed in bonnet dormers to match the bonnet’s arch.

Wall dormer

Rather than emerging entirely from within the existing roof, a wall dormer is an extension of the exterior wall below. The siding on the main part of the house continues up into the dormer, making the front of the dormer flush with the front of the house.

The roof and sides of a wall dormer can be styled in any of the ways discussed above.

Lucarne dormer

Inspired by those found on Gothic cathedrals, residential lucarne dormers are typically tall and very narrow. Most feature gable roofs above the windows.

Adding a Dormer: Things to keep in mind

Not a DIY project

Dormer Addition for River Hills Home Remodel
The River Hills dormer project in progress / LaBonte Construction.

Adding a dormer to your home is a huge undertaking. It involves altering structural components and installing watertight seals. If these tasks are done improperly, it can lead to unsafe living conditions and costly repairs down the road.

Make sure your house can accommodate a dormer

Depending on the type of structural roof framing in your home, adding dormers may prove difficult. Request a visit from the experienced contractors at LaBonte Construction to discuss the feasibility of a dormer addition project.

You may need to install additional structural framing in order to support new dormers, which will significantly add to the overall cost.

If an inspection reveals that you need a new roof, integrate both projects together. You may have to replace the roof regardless of its condition, based on the scope of the dormer project.

The last thing you want to do is add a dormer to your home and then deal with leaking in your new home addition. Instead, get an inspector to check out the roof before starting on a dormer addition.

With any dormer house additions, it will take the expertise of a home remodeling team to be sure that your home’s structure stays strong and unwavering. While it can be a luxury to add usable square footage to your home, you want to do it in a safe and sensible way.

Draining

When you place an entire structure on the eave of your roof, you may run into drainage issues.

You may need to install a gutter or other drain assistance to ensure that the roof stays in good condition and is free from any debris or buildup if water gets trapped up there. Talk with your contractor about the obstacles that a dormer addition may pose to roof drainage.

Increased Leak Risk

Like chimneys, dormers penetrate the main roof, which means there’s a greater likelihood of leaks. Flashing—a method of interweaving shingles and sheet metal—reduces the risk of leaks. But increased vulnerability to leaks remains.

Permits

Depending on the number of construction or remodeling projects in your area, you may face delays when obtaining permits. An experienced contractor will secure the correct permits and ensure that your project proceeds safely and efficiently.

Cost

How much does it cost to install a dormer house addition? The truth is that it could range anywhere from $20,000 – $30,000. Here are some factors that go into a dormer house addition cost:

  • Square footage.
  • Type and quantity of dormer windows.
  • Reinforcement of existing structure.
  • Finishing remodeling costs.
  • Roof replacement.

Once you have considered all the details that will come up during a dormer house addition, you can be prepared to expect the unexpected when construction starts.

Increase Your Home’s Value with a Dormer Addition

According to Angi.com, (formerly Angie’s List), most dormer additions will provide a return-on-investment of about 40% due to the increase in usable space.

If it’s time for adding a dormer to your home, contact us at LaBonte Construction.

We were voted Best of Milwaukee 2024 by Shepherd Express readers in the Home Remodeling, Basement/Rec Room Remodeler, Bathroom Remodeler, and Kitchen Remodeler categories.

Considerations for Remodeling a Condo

As a condo owner, you enjoy most of the same freedoms as an owner of a traditional house. But when remodeling a condo, you may realize that certain parts of your home don’t belong to you.

Your homeowner’s association (HOA) may respect the privacy and autonomy of each condo and its occupants. But it also must ensure the integrity of the entire structure, for the benefit of all residents.

So some items within your unit—like plumbing and electrical systems—are shared among multiple units, and considered common property.

Remodeling a condo: Know what you can and cannot do

The first step to renovating a condo is understanding the rules established by your HOA. Following their guidelines—usually called Covenants, Conditions and Restrictions (CC&Rs)—is essential during any remodeling project.

In addition to structural integrity, HOAs are sensitive to one of the most common owner complaints: noise. Minimizing noise guides many HOA policies.

For example, you may want to replace old carpeting with nice, new hardwood or laminate flooring. It’s a popular upgrade for improving quality of life and increasing resale value. But you may also have to install insulated padding beneath the floor to deaden the clicking of your high heels.

As home improvement website The Spruce points out, some municipalities require permits for renovating a condo. For example, the City of Minneapolis requires a permit for condo owners to replace carpet with any kind of hard flooring.

Projects requiring HOA approval

Condo Remodel from Wisconsin Contractors

When remodeling a condo, the following items are structurally significant for the entire building, so any alterations generally require HOA approval.

  • Interior or exterior walls
  • Structural floor
  • Ceilings
  • Columns
  • Finish flooring
  • Plumbing
  • Electrical
  • Aesthetic changes to the exterior

Projects not requiring HOA approval

Although you should always verify with your HOA, it is likely that the following items will not require approval.

  • Interior painting
  • Crown molding
  • Replacing baseboards
  • Replacing or repairing door and window casings
  • Replacement of light fixtures, outlets, and switches
  • Replacement of shower, bath, or sink fixtures
  • New floors that are the same type as the old floor
  • Built-in cabinets and new kitchen cabinets

The type of condominium you live in may influence what kind of updates you can make. If your home is considered a site condo, townhome, or planned unit development, you may have more freedom in renovating.

Some CC&Rs may require permits or formal approvals before any type of work can begin. If in doubt, find out!

Remodeling a condo: Know when and where you can do it

The CC&Rs may have specific guidelines for what days of the week and times of day renovation work can be done. Rules may also govern the hours during which materials can be delivered to the building. They may also specify certain entrances, elevators, and hallways.

Not checking on these logistical details in advance can cause massive headaches later when trying to schedule deliveries or appointments.

Measure first, move second

In addition to knowing which doors and elevators you can use, it’s important to measure their dimensions first. You don’t want to haul a large drywall panel to your condo’s elevator before you realize it doesn’t fit.

Stay in your neighbors’ good graces

Home Remodeling Regulations in Wisconsin

Cultivate and maintain a good relationship with your neighbors before you begin your remodeling project. Asking them about their experience with remodeling may give you valuable insight while also building a rapport—and their trust.

That positive relationship may be valuable if the access panel for your bathtub’s plumbing is in your neighbor’s bedroom.

And even if the access panel is within your own condo, the plumber may need to shut off the water. Will that affect your neighbor’s water supply?

Remodeling a condo: Give yourself a long timeline

Given all the requirements your CC&Rs may have, and the time required to secure the approvals and permits, it’s important to have a flexible timeline. Carefully estimate how long you think everything will take—and then add at least two months.

Be flexible

Some owners enter a project with very specific ideas about the finished product. They may have their heart set on a particular fixture or a specific type of faucet.

However, being open to suggestions from experienced professionals—or a creative friend or neighbor—may guide your project in exciting, unexpected directions. A cost savings here may create a new opportunity there.

Also, if you’re planning extensive renovations, you may want to find a place for you and your family to stay during the process.

When to consider hiring a contractor

Even if you think you can renovate a condo yourself, the job presents some unique challenges that hiring a contractor can solve:

  • Navigating your HOA’s regulations can be nerve-wracking. Let a professional contractor review your CC&Rs with you to ensure the renovations are within regulations.
  • In a condo, the space is limited, finite, and shared. An experienced contractor specializes in maximizing space and working within the restrictions of multi-family housing.
  • CC&Rs often limit renovation work to normal weekday business hours, to minimize noise on evenings and weekends. Rather than choose between your first-shift job and your renovation, you may want to hire a contractor instead.

When you’re ready to begin remodeling a condo, please contact us at LaBonte Construction.

We were voted Best of Milwaukee 2024 by Shepherd Express readers in the Home Remodeling, Basement/Rec Room Remodeler, Bathroom Remodeler, and Kitchen Remodeler categories.

Guide to Furnace Efficiency

We offer this guide to furnace efficiency to help you understand AFUE and make the best choice for heating your home.

Before the mid-1980s, many household furnaces were so inefficient that only 60% of their heat warmed the house. The other 40% warmed the outside air through their vents.

In 1987, the National Appliance Energy Conservation Act introduced idea of a “high-efficiency furnace” in the United States. The law required new household furnaces to use at least 78 percent of their heat to warm the home.

Guide to Furnace Efficiency: Measuring efficiency

AFUE Guide to Furnace Efficiency in Remodeled Homes

Today, a standard modern furnace converts 80% of its fuel into heat for your home. In the industry that’s known as 80% AFUE (Annual Fuel Utilization Efficiency).

The remaining 20% is vented out of your home, usually through a chimney flue or PVC drain pipe.

For a furnace to be considered high efficiency, it has to be at least 90% AFUE. The most advanced modern furnaces can achieve about 98% efficiency.

Low-Efficiency

Older furnaces typically have an AFUE of 56% to 70% and feature a continuous pilot light. They’re single-stage furnaces, meaning they’re either on or off.

With a simple exhaust system, the furnace depends on the natural draft of your house instead of fans. And you typically can’t adjust the speed of the blower.

Mid-Efficiency

Most furnaces today are standard or mid-efficiency, with an AFUE from 80% to 83%. Priced between $900 and $1,800, they cost much less than high-efficiency models.

These systems may include an electric ignition or complex exhaust fans to direct heat and run smaller overall. Some are single stage, while others are two-stage designs, which offer more heating control options than just on or off.

High-Efficiency

High-efficiency furnaces—featuring the Energy Star label—have an AFUE between 90% to 98.5%. The sealed combustion chamber ensures the warm air stays in your home and the dangerous exhaust goes outside.

The furnace may include a more advanced heat exchanger, ignition, variable blower, and two-stage or multi-stage heating design.

Finding your furnace’s AFUE

Furnaces display the AFUE on a bright yellow label on the outside of the unit. If the label is missing, you can look up your model number online.

You can also determine if the furnace is high efficiency by looking at the layout. If the furnace vents to the chimney or roof via a metal flue, then it’s standard efficiency. If there is a pair of PVC pipes—one to draw and one to vent—it’s sealed combustion, or high-efficiency.

Upgrading to High Efficiency

Naturally, high-efficiency furnaces are more expensive—as much as one-and-a-half or two times the cost of standard-efficiency models.

Also, if you’re buying your home’s first high-efficiency furnace, you will likely have the added expense of new venting to accommodate the dual PVC pipe system.

But, especially in Wisconsin, the cost savings on utility bills throughout the life of the furnace will more than offset the initial expense.

There may also be tax incentives for upgrading to a high-efficiency furnace.

In addition to saving you money, higher AFUE ratings are a major win for the planet. According to the Department of Energy, upgrading your furnace from a 56% to 90% AFUE can save between 1.5 and 2.5 tons of carbon dioxide each year.

AFUE Isn’t Everything

Fully electric furnaces don’t lose any heat through venting gas, so they are all considered high-efficiency. But in Wisconsin’s cold climate, fully electric furnaces are generally cost-prohibitive.

The following comparison of heating methods for Wisconsin was calculated with the PickHvac Cooling & Heating Guide:

Natural Gas Heat
Efficiency: 90
Price ($/Therms): $0.741
Annual Cost: $1,439.91

Heat Pump
Efficiency (HSPF): 10
Electric ($/kWh): $0.147
Annual Cost: $2,858.18

Propane Heat
Efficiency: 80
Propane ($/Gallon): $1.871
Annual Cost: $3,975.56

Fuel Oil Heat
Efficiency: 75
Price ($/Gallon): $2.573
Annual Cost: $4,813.34

Electric Heat
Heater Power (watts): 23447
Electric ($/kWh): $0.147
Annual Cost: $8,372.06

A Whole-Home Approach to Efficiency

You can increase the efficiency of your furnace regardless of its rating by making your home more energy efficient.

    • Windows: Having new, tight windows helps the efficiency of your entire home.
      » See also: Our post on Energy Efficient Windows.
    • Insulation: A lot of heat escapes through the walls and roof of your home.
      » See also: Our posts on Energy Efficient Insulation and Insulation Options For Your Home.
    • Doors: Do your outside doors have effective weather stripping and high energy performance ratings? See the U.S. Department of Energy guide.
    • Ductwork: Has your ductwork been inspected for leaks? If areas of your ductwork are too narrow to handle the airflow of the furnace, then leaks can develop. This reduces the furnace’s efficiency and will cause airflow backups, creating hot and cold spots in your house.
    • Filters: Dirty filters will reduce efficiency and make the furnace work harder.
  • Programmable thermostat: According to the Department of Energy, this can save 10% a year on heating and cooling. Simply turn your thermostat back 7°-10°F from its normal setting for 8 hours a day.
  • Direct sunlight: When possible, use your windows and skylights to provide light from the sun instead of artificial lighting during the day.

Energy-efficiency improvements will save money on a new furnace or boiler, because you can purchase a smaller unit.

Increase Your Home’s Energy Efficiency

Overall, furnace efficiency varies based on the following factors:

  • Fossil fuel or electricity used
  • Size of the unit
  • Ignition style
  • Blower style
  • Exhaust style
  • Type of heat exchanger
  • Sealed or unsealed combustion system

If you’re unsure about how best to increase the energy efficiency in your home, we are happy to offer our expert guidance. Please contact us at LaBonte Construction, voted Best of Milwaukee 2024 by Shepherd Express readers.

Considerations When Building a Home Gym

Our home remodeling firm gets the most calls about building a home gym after the holidays. But seasonal weight-gain guilt and New Year’s resolutions are only part of the increasing popularity of home-based exercise spaces.

Home gyms are common home remodeling projects for fitness enthusiasts and large homes year-round.

The safety concerns of the last few years made working out at home even more commonplace. This trend was on public display during the meteoric rise of Peloton’s stock while gyms were forced to close.

Home gyms are often further down the remodeling list than adding a powder room or remodeling a kitchen. But they are often less expensive than a wine cellar or home theater.

In Milwaukee, home exercise rooms are often part of a basement remodeling project. In order to make your new home gym a place you want to use, it is important to:

  • Find the perfect space.
  • Adequately plan space based on your equipment.
  • Consider the lighting.
  • Make sure there are entertainment options.
  • Choose the best materials.

Location

Choosing the right room can affect the home gym’s aesthetic, and how often you use the space. It will also determine how extensive the remodeling process is going to be.

Choosing a room close to a bathroom means you can avoid walking through the house full of sweat.

Picking a room with natural light can make you feel more energetic and motivated during dark winter months.

Depending on the types of exercises you do, you may want to select an isolated location so your workout does not interrupt your housemates’ sleep or work.

If budget is a concern, avoid an area of the house without existing walls, and pick a spare bedroom or attic instead.

In addition to the size of the room, also consider the height of the room depending on what exercises you want to be able to do.

Remember, depending on your equipment, your room does not have to be huge!

Equipment

Take an inventory of the exercise equipment you own or will need for your workout before calling a remodeling contractor.

Doing some online research about the required clearances around each piece of equipment will give you an idea of how much space your remodeling project will need.

Don’t forget to consider the height of the machines! If you find you do not have a ton of space, consider products from companies like Mirror, Tonal, or Forme, which offer a comprehensive workout without taking up much floor space.

Lighting

New Home Gym in Remodeled Wisconsin Home

Make sure all your workout zones are well-lit.

While we encourage all our home remodeling clients to incorporate as much natural light into their projects as they can, most of our clients build a home gym in the basement, where natural light is hard to come by.

Instead of excessive LED lights seen in warehouse-style commercial gyms, we can work with a lighting designer to install layers of lighting that create a less sterile mood and be customized to your family.

Having a unique fixture not seen in commercial applications can be a really fun way to create a unique space and a sense of luxury.

By making a lighting plan before we start the remodeling project, we can make sure all your workout zones are well lit.

Incorporating mirrors can also help brighten the space as well as provide a visual component to your workout.

As with all rooms, consider the paint color and sheen. A light color can help reflect light and make a space feel brighter. A dark color with accent lights can make a room feel more industrial.

See also: Our post, Paint Sheens Explained.

If you can’t get all of the lighting you want in your space, adding glass doors or walls can brighten up a dark space and allow in natural or made light from an adjoining room.

Entertainment

Building a home gym: TV

Adding a Smart TV can allow you to access workout videos.

Maybe you have a Peloton with an integrated screen. Or you might think the mental image of a trimmer you is all you need to stay focused. But you should probably still mount a television.

Adding a smart TV can allow you to access workout videos on YouTube, from streaming services, or even a private training session over Zoom or Skype.

In addition to a TV, adding a set of speakers from your distributed audio system will allow you the same control over your music and podcasts as you have in the rest of your home.

OK, so if haven’t installed a whole-home audio system yet, Wi-Fi speakers from Bluesound or Sonos would be great too. Both options are discrete and provide access to lots of music or other audio formats from your phone.

Many of these speakers can be wall or ceiling mounted so they won’t occupy valuable floor space—or get karate kicked or body checked in the heat of the moment.

Materials

Flooring

The most common materials are vinyl, rubber, foam and turf. Weightlifters may also want a dedicated lifting platform, which is often made of sturdy wood.

Commercial gyms most commonly use rubber flooring for its durability and ease of cleaning. Athletic training facilities or sports performance centers often use turf.

Foam is a popular home-gym flooring choice, but foam floors are not as durable, are less resistant to moisture, and provide less traction.

Horse stall mats are also popular options for home gyms.

Soundproofing

Clanging, banging, and grunting are fine at Planet Fitness or the South Shore Athletic Club. But you might want to keep those noises inside your home gym.

If you have the luxury of building new walls for your home gym, you can use products specifically designed for sound reduction, such as QuietRock drywall and ROCKWOOL Safe’n’Sound insulation. There’s even soundproofing paint. On existing walls, you could add soundproofing tiles.

On a limited budget, hanging blankets or quilts on the walls can make a difference as well. But many websites, such as Soundproof Nation, list some other relatively inexpensive methods that are somewhat less tacky.

You can also replace regular, hollow doors with solid-core doors.

Other considerations

Our motto, “Home is in the Details,” applies to a home gym as much as the rest of your house.

After the major design is tackled, it is important to think about smaller items that make working out at home as enjoyable as a club and encourage you to stay with your fitness goals.

Storage

Storage solutions will help you keep the floor free from clutter. Consider hooks for resistance bands or your boxing gloves and racks for your foam rollers or yoga mats.

Cabinets

Installing custom cabinetry or a bar is a great idea for storing clean towels, a hamper for dirty towels, or house a beverage center (internal link) to keep you hydrated.

Seating

It’s nice to have a chair to sit down and tie your shoes, or a bench to relax on between sets.

Create the Best Fitness Room for Your Home

Regardless of your space or needs, contacting a qualified remodeling contractor like LaBonte Construction should be your first order of business after taking inventory of your wants and needs.

LaBonte Construction was voted Best of Milwaukee 2024 by Shepherd Express readers in Basement/Rec Room Remodeling. We were also voted best in Home Remodeling, Bathroom Remodeling, and Kitchen Remodeling, and were finalists in Home Builder.

How to Avoid Exercise InjuriesSee also: these tips from MedlinePlus, a service of the NIH National Library of Medicine.

9 Types of Plumbing Pipe and Where They are Used

In this post, we explain the different types of plumbing pipe frequently found in your home and where they are used. In our bathroom remodeling or kitchen remodeling projects, we end up tying into the existing plumbing in the house.

Plumbing pipes perform two basic functions in your home:

  • Supply lines, which are pressurized and distribute potable water from the main water utility service line to your faucets, showers, toilets, and appliances.
  • Waste or sewer lines, which carry used water out of the home.

We work primarily on older homes. They were typically built with copper or galvanized steel pipe for the pressurized lines and cast iron for the waste lines.

Types of Plumbing Pipe: Supply Lines

Metal

Metal piping owes its popularity to its longevity and durability. The primary disadvantage of some types of metal piping is that they corrode over time and can flake off rust.

The following metals contain negligible amounts of iron, so iron oxide, or rust, does not form.

Copper

Copper Plumbing Pipes in New Homes

While copper can be used as both supply and waste lines, it is most commonly used in supply lines. There are four major types of copper pipes:

  • Type M: The most common, used to carry domestic water. Type M pipe commonly supplies toilets, sinks, and faucets.
  • Type L: Thicker and more frequently seen as boiler piping and in commercial fire protection applications.
  • Type K: The thickest pipe, and overkill for our home remodeling projects. It can be used for main water lines and underground.
  • DWV (drain, waste, and vent): Used for waste, drains, and vents in some midcentury and older homes. When we encounter this type of plumbing during a home remodeling project, we usually replace it with a more modern pipe to save on cost.

Stainless steel

Stainless steel is generally not used in remodeling projects.

But some stainless-steel alloys—a nickel-steel alloy, for example—offer even more corrosion resistance than stainless steel alone.

Other materials—such as molybdenum—strengthen steel, which reduces the amount of material used and yields a lighter-weight finished product.

Brass

Brass is most commonly used between two dissimilar metals to stop a dielectric reaction. An example would be transitioning from old galvanized pipe in the wall to copper stub outs when remodeling a bathroom.

Brass costs less than other metals such as stainless steel or copper. But it can be difficult to work with because of its high melting point. In addition, it’s susceptible to tarnishing over time if exposed to certain elements.

Galvanized

Galvanized Steel Plumbing in Remodeled Homes

Galvanized steel pipes have been dipped in a protective zinc coating to prevent corrosion and rust. Commonly installed in homes built before 1960, galvanized pipe was an alternative to lead pipe for water supply lines.

Galvanized steel is not often used for water anymore because the galvanizing process is not as good as it used to be, and the pipes do not hold up. We use it only for small repairs of existing galvanized plumbing.

Long-term exposure to water causes galvanized pipes to corrode and rust on the inside.

However, galvanized steel is much more resistant than copper to freeze damage.

Plastic

Plastic pipes are generally lighter, easier to work with, and less expensive to install. They are also easier to cut and fit into tight areas. In addition, it’s generally easier to find odd or unusual plastic pieces.

On the downside, plastics are not as heat resistant and require more frequent replacement than metal piping. Also, use of some plastic pipes is restricted in some municipalities.

PEX

PEX Plumbing Pipes in Bathroom Remodeling

PEX—declared by Family Handyman magazine as the “biggest revolution since the flush toilet”—has been a game changer for us as remodeling contractors.

Short for cross-linked polyethylene, PEX is much cheaper and freeze-resistant than copper pipe. It also installs faster, and Its flexibility can sometimes save us from having to open walls during remodeling.

PEX comes in rolls, 20’ sticks, and 10’ sticks. Because PEX has a “memory”—it tends to return to its original shape—the sticks can be easier to work with in a wall cavity.

The rolls are superior for long runs because there are no joints that could be potential failure points.

PEX pipe is available in three main colors for indoor plumbing: red (for hot water), blue (for cold water), and white. While the chemical structure is the same between the colors, color coding makes it easier to trace a line for repair or make the final connections to a kitchen sink or a shower valve during a bathroom remodeling project.

CPVC Plumbing Pipes in New Bathrooms

CPVC

An upgrade from PVC, CPVC (chlorinated polyvinyl chloride) can withstand higher temperatures—up to 200°F—than PVC.

Also, it is more durable than PEX and less susceptible to damage from hazardous materials or extreme heat.

Downsides of CPVC: It is not resistant to UV rays; it has to be glued at every joint (more potential failure points); it can become brittle.

Types of Plumbing Pipe: Waste Lines

If you have an older home, you may see a mix of pipes manufactured from cast iron, plastic, copper and galvanized pipe. Here are the general kinds of waste line piping you can choose from.

PVC

PVC Plumbing Pipes in Remodeled Bathrooms

PVC (polyvinyl chloride) is generally the go-to material for waste lines. It’s highly resistant to chemicals, it’s easy to cut, and it resists heat.

Using a chemical solvent and plastic fittings, your plumber can create a lasting seal where cuts need to be made.

Cast iron

Cast iron is a very durable and highly sanitary material for use in the home. The reason to use it: it is quiet; PVC is loud.

The reasons to not use it: it is heavy and expensive, can corrode over time, and is harder to work with. Today, most plumbers use PVC to replace waste line piping.

Chromed brass

Chromed brass is an effective alternative to PVC piping in areas where the pipes are exposed or in municipalities where PVC is not allowed. Its enhanced visual appeal makes it popular for exposed drains.

Types of Plumbing Pipe: Conclusion

As you can see, there are many different options for replacing the plumbing in your home.

If you are still unsure about what plumbing options are right for your kitchen or bathroom remodeling project, feel free to contact us at LaBonte Construction—voted Best of Milwaukee 2024 by Shepherd Express readers.

Common Roof Types

If you’re considering a new roof or building an addition, you may first want to learn about the most common roof types in home remodeling, and how they impact your choice of roofing materials.

Depending on a home’s architecture, a roof can potentially make up 40% of the exterior, often playing a big role in its overall look and curb appeal.

See also: Our detailed explanation of pitch and roofing materials.

So, when the time comes to install a new roof, you’ll want to pick roofing materials and shingle colors that work well with the shape and slope of your roof, as well as complement your home’s exterior design.

Beyond the aesthetic considerations, adding a new roof is also a great opportunity to integrate energy-saving or “green” elements into your house, such as solar panels, a green roof, or a design that collects rainwater or melted snow that you can repurpose for your lawn or garden.

Also, adding a new roof style can increase the amount of living space in your home, which may justify the cost of a more expensive roof.

Moreover, while you may want to make a unique statement with your new roof, remember to make sure it complements your home’s existing design features—and blends in well with the surrounding neighborhood.

Common Roof Types

Gable roof

A gable roof is the most common type of roof in the United States: the classic triangle shape is used across many styles and geographic regions.

The gable roof is very versatile, and its simple design is easy to install and offers a timeless look. The high pitch of a gable roof allows for easy water and snow runoff into gutters and downspouts.

One possible drawback for gable roofs is that they are susceptible to damage by very strong winds.

Hip roof

A traditional hip roof consists of four equal-length slopes that meet to form a simple ridge. There are variations, such as a half-hip that features two shorter sides with eaves.

Although it is slightly more difficult to build than a gable style, the hip roof is a popular choice. All four sides can have gutters and downspouts, improving water and snow runoff.

They also perform better in high-wind areas. However, it may require extra ventilation efforts in the attic.

Also, most of a hip roof is visible when looking at your house, so the type and color of roofing shingles you choose for a hip roof will greatly influence your home’s overall exterior appearance.

Dutch roof

Dutch roof is basically a hip roof with a small gable at either end. The result is easier access to the lower portion of the roof with the added benefits of natural light, extra space, and added interest to your home’s architecture.

They can work great for attic spaces on your home or garage.

Mansard roof

It is a French design and is more difficult to build than the hip or gable roof. The mansard roof actually features two slopes within one on each side.

The bottom part of the roof slope is steeper so that the pitch of the roof barely starts. This allows more room on the inside and in most cases creates an extra space.

It offers a beautiful, elegant aesthetic, but the mansard may require structural changes to your existing house to accommodate.

Perhaps the biggest downside for the mansard roof in the Midwest is drainage.

Flat roof

Flat roofs are not really 100% flat. They must have a slight slope of at least 2% to allow for water and snow run-off.

Used most often in commercial structures like apartment buildings, malls, and office buildings, flat roofs became widely used on residential homes in the 1950s and ‘60s.

The simple design and construction of a flat roof tends to reduce building costs, but especially in Wisconsin, it is essential to hire a quality contractor. A qualified builder will ensure that your flat roof is properly sealed.

A quality flat roof offers many benefits:

  • Distinctive design that separates your property from your neighbors’.
  • Use as a deck or patio in the spring and summer.
  • Potential for adding levels to your home.
  • Adding heating and cooling units that won’t obscure the architecture of your home.
  • Ease of installing PV solar panels, which will improve energy efficiency and make the roof more eco-friendly.

Shed roof

A shed roof is kind of like a flat roof, but it’s at a much steeper incline.

With just a single slope, you will commonly find shed roofs utilized on cabins, barns, and of course, sheds. But It has gained favor on many ultra-modern builds.

Shed roofs allow for interesting window placements, from small rows of glass panes directly beneath the roof to large picture windows across the front of the house.

A shed roof offers many of the same benefits as a flat roof—including lower cost—without the risk of leaking.

But the single slope does require a strong gutter and downspouts system to handle double the water of a more traditional build.

Butterfly roof

In this very modern design, the two roof slopes meet in a trough in the middle rather than a peak.

The crease where the two sides meet creates a natural channel for directing rainwater into a reservoir—which is usually part of the butterfly design.

This eco-friendly feature can be a challenge for Wisconsin winters, but there are materials available—EPDM rubber, TPO, PVC, or some metal and other organic materials—that can work to keep a butterfly roof watertight.

A butterfly roof can greatly reduce water usage for lawn irrigation or gardening.

Also, the high walls on the edge of the roof provide a great opportunity to increase natural light in the home. Finally, a butterfly roof is very aerodynamic and can withstand strong winds.

Gambrel roof

Also called barn roof because of its most common use, a gambrel roof’s main benefit is providing additional headroom in a house’s top level, due to the low slope of the top two of the roof’s four panels.

The design also allows for installation of windows.

Looking a bit like the top half of an octagon shape, the gambrel roof works perfectly for barns with upper-level lofts to hold stacked hay.

Gambrel roofs are relatively easy to install, and can work with just about any roofing material.

On the downside, the high sloping bottom panels can create poor ventilation, are difficult to install on existing structures, and are susceptible to damage from strong winds.

Dormer roof

A dormer is more an addition to an existent roof. It is a window and a roof (gabled, hipped, flat, among others) protruding from the slope of an existing roof.

A functional dormer creates usable space out of the roof, adding natural light and headroom.

A dormer can also increase ventilation in your upper floor living area, and add unique design elements—both interior and exterior.

As with many other roof additions, a properly installed dormer requires a skilled contractor who will ensure the work is done right and not susceptible to leaks.

M-shaped roof

An M-shaped roof could basically be considered a ‘double gable’. It features two sloped sides that meet in the middle with corresponding slopes on each side. This pattern could be repeated multiple times, especially in condominiums or a strip mall.

The obvious downfall of this design would be snow and rain building up in the center where the two slopes meet but this is alleviated by a central gutter running from front to back, perpendicular to the front of the building. Even so, the pitch of M-framed roofs is generally steeper to assist in runoff and to ‘catch’ less rain and snow.

A Remodeled Brick Home in Chicago Pink

The Right Roofing Material for Your Home

Replacing or enhancing your home’s roof is one of the most important investments you can make. Choosing the best remodeling contractor is essential, but it is also important to understand the different roofing styles and material options so you can have an informed discussion.

If you are ready to discuss a new roof for your home, please feel free to contact us at LaBonte Construction.